This is a brief overview of the administrative user interface, from a more technical and administrative perspective. The administrative user interface is by default accessed by adding /cs to the site URL.
http://www.mysite.com/cs
The administrative user interface is fully accessible only with Internet Explorer 6.0 (and higher). Pop-up and modal windows must be enabled for the web site. No additional applications (plug-ins) are needed to access the administrative user interface.
Log in
To get access to the administrative user interface, the user credentials must be verified. If the user not is automatically logged in, a valid user name and password is required. If Windows authentication is used Internet Explorer will display a logon screen. When a third party authentication system is integrated via a custom provider, a custom login page will collect this information.
To access Content Studio, the user (or any of the groups that the user belongs to) must be registered in Content Studio as a valid user (or group) with access to use the administrative user interface. These basic settings are done under “Users & Groups”, “Groups in CS” in the left column. In the properties of the group, the setting “Can use Content Studio” must be set.
The access rights of the documents are set in the root properties “Document” in the “Security” tab. The corresponding settings can be set within each underlying category or folder. Settings that are set in the root are inherited to all underlying categories and folders unless they are overridden.
Log out
There is no explicit logout function. The session is managed by a session cookie, and is terminated once the web browser is closed or the user becomes inactive.
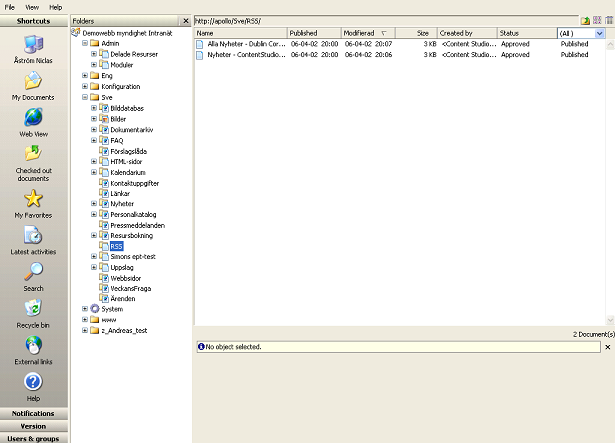
The overall structure
The administrative user interface contains most of the information that is needed to maintain and development sites in Content Studio. The three main windows are the folder structure, left columns (tabs and shortcuts) and the document listing.
Folders
All documents are stored in a folder structure. The first level consists of units, which correspond to separate containers or sections of the web site. Within each unit there are categories that contain documents of a certain type or other categories. There is a special root folder named “System” that contains AS components, application code and other system related elements.
Folders are described in more detail in the section Content Studio Structure.
Shortcuts
The left column contains a number of shortcuts to easily handle some of the most common operations. They are also available through menu options. It is possible to search for documents using the document identifier, the document name and even on the content of the document. There are some predefined views; documents owned by the user, documents checked out by the user, the most recently used documents and documents that are marked as favorites.
Web view and Preview
The content of any document can be previewed before it is published. The preview is applicable on documents and individual components and can be used when developing the web site. The web view is the same thing as applying preview on an HTML document, and shows what the document would look like in a web browser.
Due to the nature of any preview, there might be differences in the appearance and behavior between the preview mode and the actual appearance on the web site. It is however always recommended to preview the document before publishing a page.
Right-click menus
To every element in the information structure there is a menu that is accessible with a right-click on the pointing device. It contains all available options for the selected element. The Properties option contains the settings of the element. Depending of the element type, there may also be operations like opening, editing, copying, revision history, preview, create new elements and update.
The Webitor
The webitor is a WYSIWYG editor component that can be included in any editing template (AS component AS_Misc/Webitor 2.0). It can manage fonts, text styles, HTML code, images and virtually anything that is needed to create the visual part of a web page.
In general, it is not wise to allow users to do anything that the Webitor is capable of. The web site design and accessibility requirements usually limit the possibilities. It is in general recommended to disable the options to select font, insert tables and insert live object. It is also recommended to force pasted text to be without formatting, because material from other tools (such as Microsoft Word) often contains HTML formatting that not is allowed in this context.
Document publishing management
The documents are maintained by Content Studio to allow revision control and publishing control.
Check in and check out
To be able to change the content of a document it must be checked out from the revision repository. This guarantees that the latest revision always is retrieved. Once the document is checked out, no one else is able to make changes to that document. If you try to check out an already checked out document, there will be a warning and a possibility to force checkout of the document. This should only be done if you are sure that it is correct to do so, since the previously checked out version (including all its changes) will be lost.
When the editing is finished, the document should be checked in again. This creates a new document revision, making the document free to be checked out again.
Revision control
Every time a document is checked in, a new document revision is created. The revisions are numbered from one (the first revision) and upwards.
The revisions can be investigated with the right-click menu "Versions". This will list all revisions with information on when the revision was created and approved. It is easy to get back an old revision of a document. Doing this will create a new revision which is a copy of the content of the older revision.
Drafts and published documents
To increase security, it is sometimes wise to separate the approval permissions from the permissions to create the content. This means that someone else must approve the content before it is published. The permissions may also apply to the ability to reject or remove content.
The settings are controlled by the regular security settings, usually defined on categories and user groups. The global rights and the advanced effective security settings can also be used to control this in great detail. The following standard category settings are available to control the approval permission:
| Permission | Description |
|---|---|
| Write & Create | The user can create new documents and edit existing documents. The modified document will be in the state "Draft", waiting for approval. |
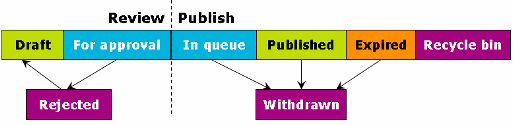
| Publish | Approves a draft document for publication on the web site. The approved document will be queued until the publication time comes, and then it will be in the state "Published". When the publication time expires, the document enters the state "Expired" and is no longer available on the web site. |
| Delete | The user can delete documents. Deleted documents are moved to the recycle bin, including all revision information. The deleted document will be in the state "Recycle bin". To remove it completely, the recycle bin must be emptied manually. |
When a document is checked in it is kept as draft document, and it is not publicly available. To publish the document it must be approved. If the user is allowed to approve its own documents, there is a direct option to “Save and approve”. The draft revision will not be visible on the web site, but it will be used as the basis for further modifications.
Reject and Withdraw
The advanced security settings include possibilities to add rejection mechanisms. They are rarely used, but will enable a more detailed document publishing workflow. To make the really powerful, they should be used together with some kind of notification mechanism.